
Thursday, January 26, 2017

Friday, March 4, 2016
17 Ways I make or save some extra cash
I'm sure we all at some point of our lives really could've used a bit of extra cash. There are real, legitimate ways to earn a little bit of side money and also save a bit on groceries without clipping coupons.
You've probably heard of some of these ideas before, but if not here are a few money saving / money making tips for a little extra cash. Nothing you can make tons of money off but it pays the minimum amounts due on my credit card bills with real cash, sometimes a little extra depending how much work I put into them or some offer gift cards which I can then use for groceries or something else we need.

1. Inbox Dollars - Inbox Dollars allows you to earn money by taking surveys, playing games online, listening to loyalty radio, using their browser to search the web, shopping through their links, printing and using coupons, watching videos, completing different offers and more... With them I can guarantee myself at least $30 - 40 a month with minimal effort if I want more I just work a little harder that month. Once you reach a minimum of $30 you can cash out and be mailed a check. There is a $3.00 processing fee, however they have always offered me an incentive, they will cover the cost of the processing fee if I reach a minimum of $40 within 30 days. And I have never had a problem reaching that goal.
2. Swagbucks - Similar to Inbox Dollars allows to earn money by taking surveys, watching SwagBucks TV, listening to loyalty radio, searching the web, shopping, printing and using coupons, signing up for offers. The key here is to reach you daily goal every day to earn more SB that you didn't have to work hard for. Every 100 SB = $1. I usually cash out for the $25 Paypal. Which typically takes me less than a month to earn. It does take about a week to actually see it in your Paypal account while they process it but rest assured that you will get it. All dependent on how much time I put in but usually I will try to reach my daily goal and go on about my day after that. Earn online or on their app.
3. Send Earnings - Pretty much exactly the same as Inbox Dollars. You will notice they layout and features are almost exactly alike. Cash out at $30. Sign up using my link and get $5 to start in your account. (no app available yet)
4. Perk TV - You can earn cash watching videos, playing games and through their several apps like scratch and win or play trivia. I play the videos for a majority of the day on my phone, tablet or laptop sometimes all three at once and earn anywhere from $1-2 a day. You can choose to redeem for gift cards or get Perk Wallet and use their Discover card as a debit card(certain restrictions apply). I rather use it towards Amazon or Walmart gift cards since these stores offer the most variety from groceries to clothes to electronics etc and are sure to meet whatever my needs may be.
5. OnGo Surveys app - This is a survey app. The surveys are not many but when they become available act quickly. They are high paying most of the time and require under 5 minutes of your time. They also offer missions. I got paid $10 to rate my Kroger grocery shopping experience once. Download their app and check at least once a day for any new surveys, if your start a survey but do not qualify they will give you 10 cents for your time. Once you reach $10 you can get cash into your Paypal account and it will be there within seconds.
6. Make Money app - I don't do much on this app except for daily checkins, occasionally download and start an app or watch videos. Once you reach 5000 points you can get $5 in your pay pal account.
7. Earn Cash app - Similar to Make Money app. Do daily checkins, download and start an app or watch videos. Once you reach 5000 points you can get $5 in your pay pal account.
8. App Trailers app - Watch short videos in different categories. Every 1000 points gets you $1. Cash out for Paypal begins as low as 500 points which is equal to 50 cents.
9. Ebates - I think most people have heard of this. Earn cash back for shopping online through the ebates link to their website. Great if you're already planning to make a purchase make sure to do it through their link and earn some cash back while you're at it. I do suggest that you compare rates offered from Ebates, swagbucks, sendearnings and inbox dollars as they vary and you want to make sure that you are getting the best deal.
10. Ibotta app - I love using Ibotta. Since I started using them about 2 years ago I have earned over $200 on cash back on my grocery purchases. I am a very casual user and mostly get the any brand offers. It is a great way to get cash back on things you are already planning to purchase and for those of you that coupon you can stack up and double up on the savings. Earn by scanning the barcode on the product and taking a picture of your receipt. Sign up using my link and you will get $10 upon redeeming your first rebate. You can cash out at a minimum of $20 for Paypal and you can also pick from different gift cards.
11. Savingstar app - With SavingStar they work with certain stores. Their list is pretty big from Kroger, CVS, Shoprite, Target and Walmart just to name a few but there are many more. Some are tied to your stores loyalty card while with others such as Target and Walmart you submit your receipt. You must add your offers prior to making a purchase. When you purchase from stores with a loyalty card there's nothing else you have to do, just wait and within a few days you will see your savings added to your account. With stores where you need to submit your receipt you have to scan the barcodes on the products to make sure they match their offers and then snap a picture of your receipt. Within a few days they review your receipt and add the savings to your account. Note however that sometimes they get really busy or your store may report your purchase a little late and it can take up to 3-4 weeks for your reimbursement. However they do have a variety of offers with brands like General Mills, Glade, Dove, Suave and more. Almost all of which are mostly available month after month. They also offer a healthy item every Tuesday and occasionally a freebie on Fridays. You can almost always stack these offers with paper coupons as well. Cash out is at $5 to paypal.
12. Mobisave app - The best part of this app is that it is NOT store specific. You can purchase your groceries anywhere that provides an itemized receipt and get your rebate via paypal as soon as your receipt has been approved. Usually within minutes, at most hours. No waiting for a minimum to cash out. They offer rebates on food, magazines(new), health, baby, household, beauty and pet care items. Best of all they have recently added any brand offers, they have given rebates on milk, eggs bacon, apples, oranges, hand soap, dish soap, pain medication and more. I just love them. I haven't been with them very long but so far I have earned over $36. This is another app you can stack up on savings if you coupon. One important thing with them however is that you MUST choose the offer BEFORE making your purchase. So make it a habit to check their offers and pick them at the latest before you pay at checkout. Otherwise you will not be eligible for reimbursement. Offers renew every Monday but watch out I have seen them add offers mid week.
13. Shrink app - This app is great for organic and healthy products. You can also earn on any brand rebates. Their past offers include fresh meat, eggs, yogurts, different fruits or vegetables and more. The any brands is mostly what I use them for but it is also great for trying new organic products at a discount. Because I mostly use it for the any brand offers it takes a while for me to cash out but any savings is better than none. With them so far I have earned over $31 total since using them. Sign up with my code and earn a $1 bonus. You can also earn loyalty points and cash in for freebies. The best part is they're not tied to any store so all you need is an itemized receipt to earn you cash.
14. Checkout51 app - Another grocery app saver. Offers renew every Thursday. Most offers are product specific but there are some with certain store restrictions so make sure to check the details for each offer before making a purchase. They also offer a healthy item each week which you can pick. Usually fruits or vegetable to choose from. Pick which offer you want to redeem. I love getting bananas because even if I buy just one banana and pay 17 cents in store they give me 25 cents so I get a free banana and make a little change. With Checkout51 you have to wait to cash out at $20. It takes me a while because I pretty much only get the healthy offer but even with that over time I have earned over $81 using them.
15. ReceiptHog app - It doesn't get any easier than this. Get paid just for snapping a picture of your receipt at almost any place including gas station receipt and restaurants. Simply take a picture from top to bottom and get rewarded. You can cash out with 1000 coins = $5 but if you're patient and wait a little longer you get a better value. At 4500 coins you can get $30.
16. ReceiptPal app- Another super easy one. Just take a picture of your receipt. The amount of your purchase does not matter. Every four receipts earns you 100 points. for 400 points you can get $1 gift cards, you can choose from Amazon, CVS, Gamestop and more. They even have resturant.com gift cards too if you want to treat yourself to a night out.
17. Kroger's App - Free Friday download coupon - This is self explanatory, every Friday, Kroger offers a freebie. A full size product for free. Since we moved to Texas we have taken advantage of this. With this we have been able to get free Yoplait and Kroger brand greek yogurt, 59 oz Welch's juice, chocolate bars, a Take 5 bar, Annie's mac and cheese, organic popcorn, Uncle ben's flavored grain rices and more. You have to load the coupon on to your account on the Friday it is being offered but they give you a really long time to make your purchase before the offer expires.
I hope these ideas are useful to you guys If you have any questions for me or any additional savings tips for me please let met know in the comments below.
Disclousure: This post contains affiliate links. I will earn a percentage at no cost to you. Thank you for clicking and helping me continue this site and supporting this SAHM.
Sunday, February 28, 2016
Menu Planning Printable - Help yourself cut your grocery budget
Hey guys.
I've been hard at work planning and making this printable for myself to share with everyone.
So in an effort to have a solid menu plan and shopping plan in place before heading out to the store I plan to start doing my shopping on Saturday's. My ad circulars come to my mailbox on Wednesdays or aren't available on any apps until late Tuesday or until Wednesday. I usually head to the store having maybe looked at an ad or two for a few minutes and tend to miss things. Like lets say eggs were on sale for $1.89 at Aldi's, not bad, but if I had really taken the time to study all the circulars I would have seen that they were 99 cents at Albertsons. So the extra time will help me avoid making those kinds of mistakes. Another reason I think it will work better for us is because we are all home, there's no need to rush home to get ready for work or to pick up my daughter. This way we can run all our errands on the same day, visit multiple stores to snag the best sales for the most savings without the added pressure of having to be back home at a certain time.
So as promised I wanted to start menu planning. I had been trying to menu plan on a regular piece of notebook paper but I found I was just kind of throwing things on there that in the end didn't make sense. So the more I tried paper after paper, I said to myself I need to find a better way. I searched the internet for a printable because I really wanted to create a successful plan where nothing would end up forgotten or going to waste. I feel proper organization is necessary for it to be successful. Plus who doesn't want a super cute printable. But everything I found was just not fitting the criteria for me. So I set out to create my own, which wasn't easy with my browser freezing twice creating the same template a total of three times #TheStruggle. I wanted a place where I could plan for breakfast, lunch and dinner for all 7 days of the week. Log what I had to work with, like what was in the pantry, fridge or freezer? What needed to be used right away? What was I missing? What did I need to go shopping for? I also needed a space to give myself reminders a bit of a to do list to prep ahead so I wouldn't forget to do something that was necessary for a dinner I had planned. Like defrost meat or soak dry beans overnight etc. I need that, I mean it, after having these kids I swear I am honestly lucky to just remember my name. So a reminder list is crucial to me so I don't ruin my plans and throw off the whole menu planning.
Because I didn't find one that worked. I made my own and decided to share with all of you incase it would be useful to anyone.
Download your free printable using the link below. For my printer I had to set the image to 49% to fit the entire page. You may have to adjust for your printer in your settings.
Happy menu planning.
Click HERE for your free printable. Download through dropbox.
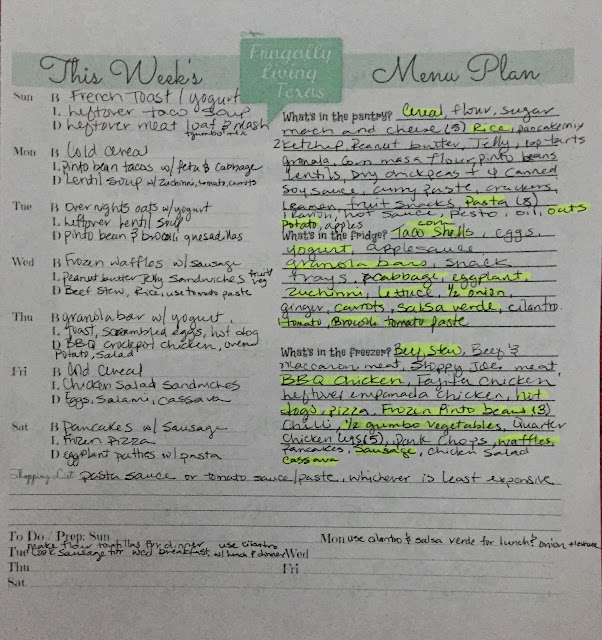
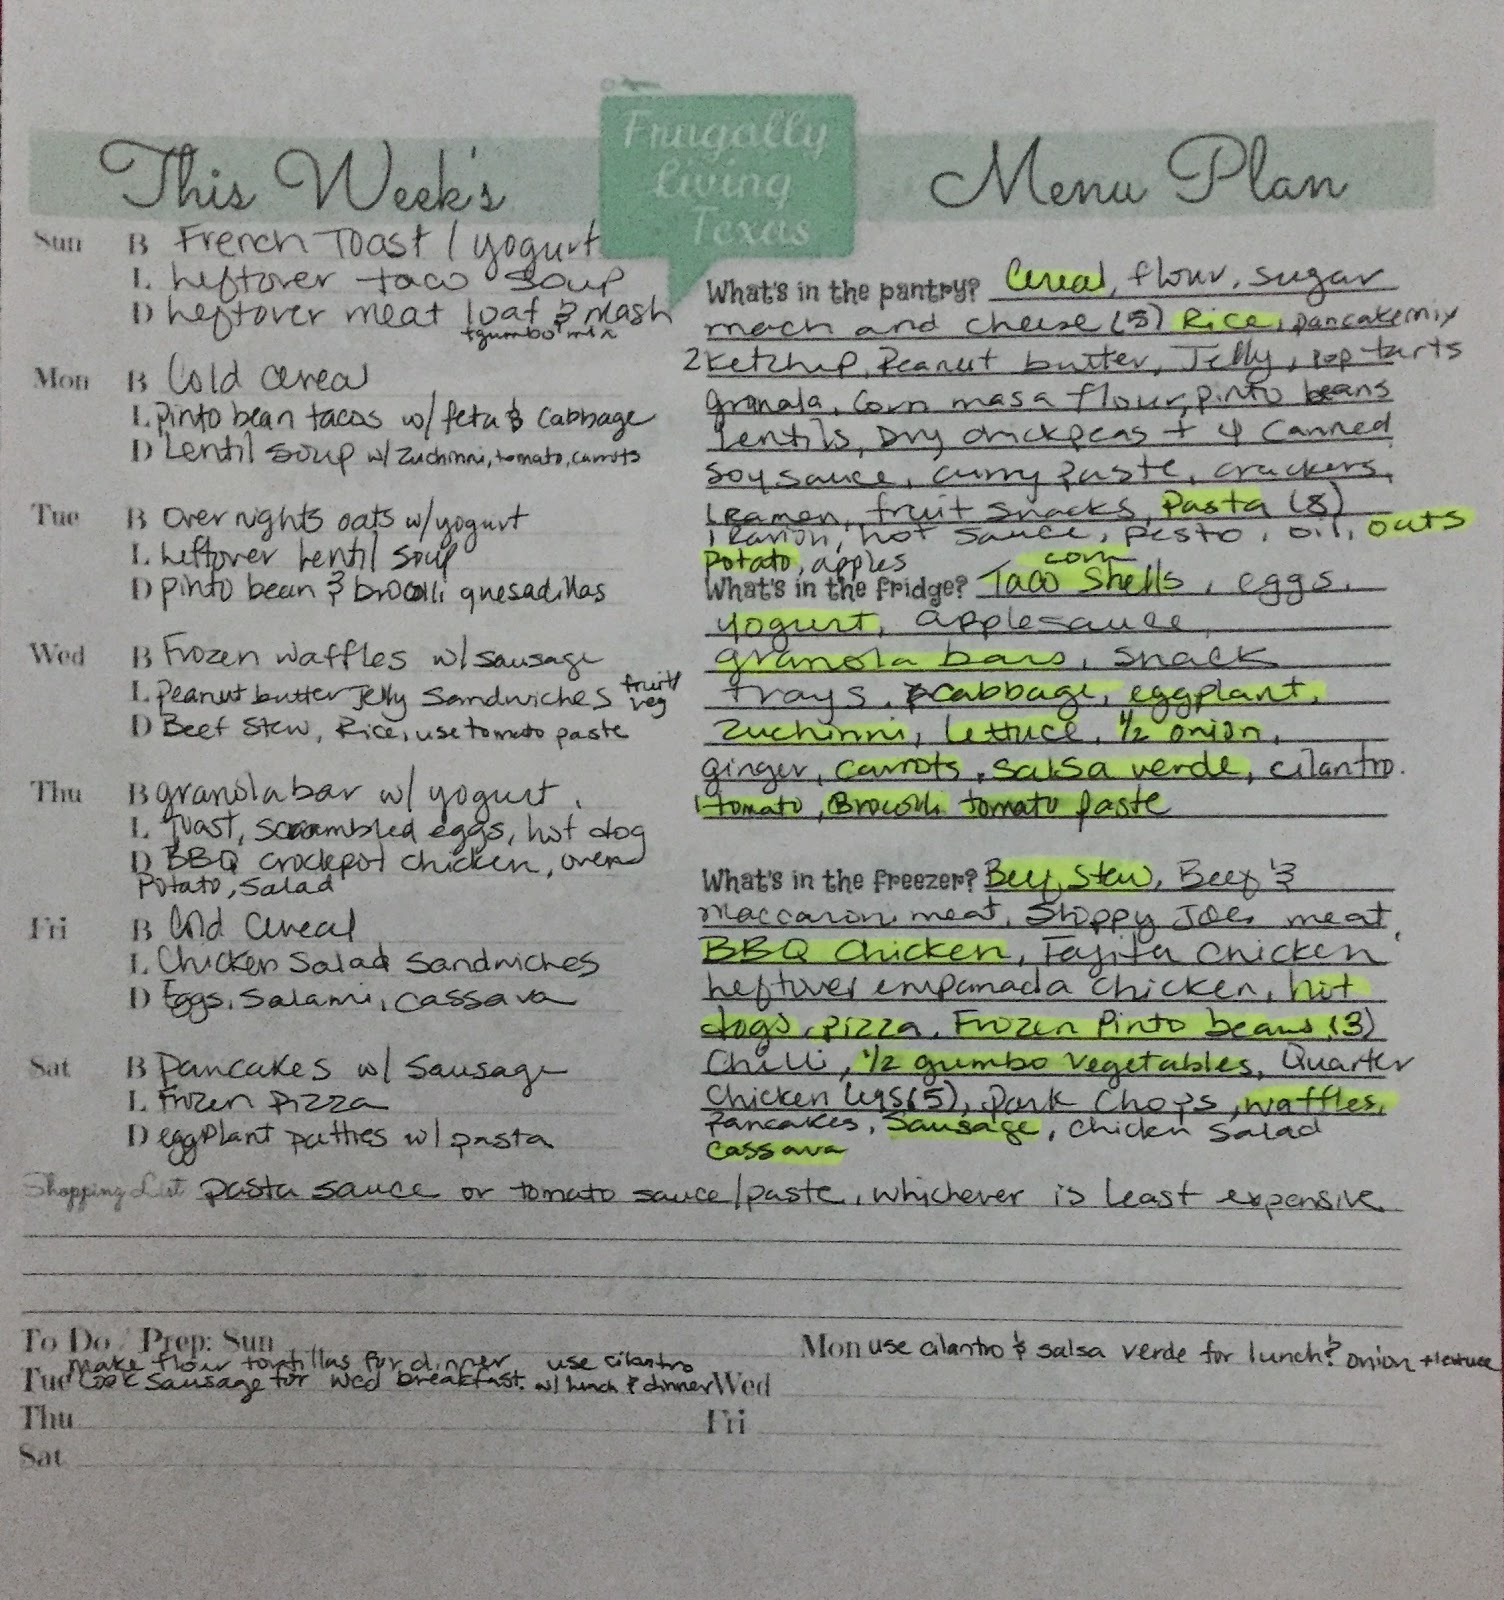
Here is my real life example of how well it worked for me. I used a highlighter to cross off things after I had incorporated them into the menu. I tried to make use of all the perishables especially.
I've been hard at work planning and making this printable for myself to share with everyone.
So in an effort to have a solid menu plan and shopping plan in place before heading out to the store I plan to start doing my shopping on Saturday's. My ad circulars come to my mailbox on Wednesdays or aren't available on any apps until late Tuesday or until Wednesday. I usually head to the store having maybe looked at an ad or two for a few minutes and tend to miss things. Like lets say eggs were on sale for $1.89 at Aldi's, not bad, but if I had really taken the time to study all the circulars I would have seen that they were 99 cents at Albertsons. So the extra time will help me avoid making those kinds of mistakes. Another reason I think it will work better for us is because we are all home, there's no need to rush home to get ready for work or to pick up my daughter. This way we can run all our errands on the same day, visit multiple stores to snag the best sales for the most savings without the added pressure of having to be back home at a certain time.
So as promised I wanted to start menu planning. I had been trying to menu plan on a regular piece of notebook paper but I found I was just kind of throwing things on there that in the end didn't make sense. So the more I tried paper after paper, I said to myself I need to find a better way. I searched the internet for a printable because I really wanted to create a successful plan where nothing would end up forgotten or going to waste. I feel proper organization is necessary for it to be successful. Plus who doesn't want a super cute printable. But everything I found was just not fitting the criteria for me. So I set out to create my own, which wasn't easy with my browser freezing twice creating the same template a total of three times #TheStruggle. I wanted a place where I could plan for breakfast, lunch and dinner for all 7 days of the week. Log what I had to work with, like what was in the pantry, fridge or freezer? What needed to be used right away? What was I missing? What did I need to go shopping for? I also needed a space to give myself reminders a bit of a to do list to prep ahead so I wouldn't forget to do something that was necessary for a dinner I had planned. Like defrost meat or soak dry beans overnight etc. I need that, I mean it, after having these kids I swear I am honestly lucky to just remember my name. So a reminder list is crucial to me so I don't ruin my plans and throw off the whole menu planning.
Because I didn't find one that worked. I made my own and decided to share with all of you incase it would be useful to anyone.
Download your free printable using the link below. For my printer I had to set the image to 49% to fit the entire page. You may have to adjust for your printer in your settings.
Happy menu planning.
Click HERE for your free printable. Download through dropbox.
Here is my real life example of how well it worked for me. I used a highlighter to cross off things after I had incorporated them into the menu. I tried to make use of all the perishables especially.
Hope you guys like it. Speak to you next week.
Saturday, February 27, 2016
Week 3 - Update - Cut Back Grocery Shopping
This week we took advantage of Aldi's meat special. of 1.89 a pound for ground beef. They also had chicken thighs on sale for .49 cents a pound but by the time we got there they were none and if any of you know Aldi's, once they're gone they're gone. What can you do, you win some you lose some right. We went ahead and grabbed ourselves two packages of the ground beef (they come in 5-lb rolls) and a pack of green peppers priced at 4 for $1. We also stopped at Kroger and used my $2 off $10 meat coupon to buy some boneless skinless chicken thighs making them $1.32 the pound and got a little over 6lbs Not as good as Aldi's, but what can you do. I usually try to get my meat at $1.99/lb or less so in my book it was still good. Plus it was convenient to not have to debone them and remove the skin my self. Which is what I do most of the time and then save the skin and bones to make chicken stock.
Remember I said I wanted to plan my meals a little better. Well I didn't plan pre buying the meat (in fact the meat was kind of a spur of the moment buy) but when I got home I figured I have to do something better than just popping it in the freezer as is., so I planned ahead quite a bit. It took a few hours because I didn't go in with a plan and came up with all the recipe ideas as I went along but I think its better than not having a game plan at all.
See here is what I did.

16 meals were produced from the proteins that were purchased. Two didn't make it into the picture, oopsies. I made sure to use ingredients that were already in my fridge, freezer or pantry plus the peppers I had just purchased. I also made sure that they matched with sides I could make at home from things I already had on hand as well, such as potatoes, rice, pasta or frozen vegetables.
The good thing is that because it was divided into so many meals I was able to use throughout the remainder of February and about a week into March or longer if I continue to add meatless meals into the mix in between.
The meals are:
1. BBQ chicken thighs - mashed potatoes and frozen vegetables
2. Curry chicken thighs - with white rice and beans
3. Honey garlic ginger soy chicken thighs - with white rice
4. Lemon cilantro chicken thighs - inside homemade pitas with fries from freezer
5. Thighs for making chicken salads sandwiches - on homemade sliced bread
6. Fajita Chicken thighs - on homemade flour tortillas
7. Beef stew - with white rice
8. Taco meat - homemade corn tortillas, onion and cilantro
9. Sweet and sour meatballs - with white rice
10. Beef - added to large elbow macaroni
11. Sloppy Joes - with homemade buns and fries from freezer
12. Salisbury meatballs - with homemade brown gravy and mashed potatoes
13. Hamburger patties - with homemade buns and fries from freezer
14. Meat loaf - with potatoes and frozen veggies
15. Thai Beef - with white rice (not pictured)
16. Thighs for grilled chicken salad - with lettuce, peppers, onions, tomatoes, cucumber (not pictured)
In the end I would say this cut back grocery shopping was a half success. While we did far less trips to the grocery store than usual and spent less money on each of our trips we still spent more than I was hoping for and went out more than even intended, at some point it kind of fell apart and I was a bit disappointed. Okay, ok a lot disappointed. I do think however that next month we can do an even better job with our budget and making even less trips. There were times where because my husband is practicing his driving for his license we ended up near a shopping center or at one and kind of just went in for a few things, like lets check out the clearance and oh lets get milk and made some impulse buys we didn't NEED. We certainly made use of them or stored them in our fridge or pantry but we really could've gone without because we had all our needs met already. My husband sometimes says "lets go out for a drive and/or get this one thing" and though I try to convince him lets just put it on a list and get everything we need on one day so we have less temptation and waste less gas on needless trips but convincing him doesn't always work or maybe I am not trying hard enough.
We have started using Mint.com and I think this will also give us a better idea of where our money goes and help us keep a closer eye and tighter leash on things, I think its already helping hubby see that these spur of the moment driving adventures are not helping us stick to our budget and we are both promising to keep one another in check about it. Hopefully next month we can do even better and continue to grow from there.
I plan to start menu planning based off the weekly ads and whatever is currently in my pantry, fridge or freezer. I shop Kroger most of the time with the occasional trip to Aldi, Albertsons or Walmart and my beloved Dollar Tree. I will often make a day of shopping since all these stores are within 10 minutes of my apartment and just hit them up in order from furthest to closest depending on what sales are available. Walmart usually only gets used for when we have more than just food shopping to do which is rare. Dollar Tree on the other hand we end up in way too often and yes everything is a $1 but when you fill up your cart with $1 items eventually it really adds up to surprising amounts.
Thank you all for joining me on this challenge. I hope we can all learn something from what I may have done right to what I may have done wrong. I think we started off strong and committed and fell off track. I hope to see more of you enjoying my page. Join me next month as we attempt to really get on track with getting this budgeting thing to work and as I integrate menu planning into our lives to hopefully add to our savings.
Leave a comment below if you have any thoughts or tips to share with us. Appreciate it, until next week.
Also check back soon for a little mini project I have in the works for Free printable to make Menu Planning easy and hassle free.
Remember I said I wanted to plan my meals a little better. Well I didn't plan pre buying the meat (in fact the meat was kind of a spur of the moment buy) but when I got home I figured I have to do something better than just popping it in the freezer as is., so I planned ahead quite a bit. It took a few hours because I didn't go in with a plan and came up with all the recipe ideas as I went along but I think its better than not having a game plan at all.
See here is what I did.

16 meals were produced from the proteins that were purchased. Two didn't make it into the picture, oopsies. I made sure to use ingredients that were already in my fridge, freezer or pantry plus the peppers I had just purchased. I also made sure that they matched with sides I could make at home from things I already had on hand as well, such as potatoes, rice, pasta or frozen vegetables.
The good thing is that because it was divided into so many meals I was able to use throughout the remainder of February and about a week into March or longer if I continue to add meatless meals into the mix in between.
The meals are:
1. BBQ chicken thighs - mashed potatoes and frozen vegetables
2. Curry chicken thighs - with white rice and beans
3. Honey garlic ginger soy chicken thighs - with white rice
4. Lemon cilantro chicken thighs - inside homemade pitas with fries from freezer
5. Thighs for making chicken salads sandwiches - on homemade sliced bread
6. Fajita Chicken thighs - on homemade flour tortillas
7. Beef stew - with white rice
8. Taco meat - homemade corn tortillas, onion and cilantro
9. Sweet and sour meatballs - with white rice
10. Beef - added to large elbow macaroni
11. Sloppy Joes - with homemade buns and fries from freezer
12. Salisbury meatballs - with homemade brown gravy and mashed potatoes
13. Hamburger patties - with homemade buns and fries from freezer
14. Meat loaf - with potatoes and frozen veggies
15. Thai Beef - with white rice (not pictured)
16. Thighs for grilled chicken salad - with lettuce, peppers, onions, tomatoes, cucumber (not pictured)
In the end I would say this cut back grocery shopping was a half success. While we did far less trips to the grocery store than usual and spent less money on each of our trips we still spent more than I was hoping for and went out more than even intended, at some point it kind of fell apart and I was a bit disappointed. Okay, ok a lot disappointed. I do think however that next month we can do an even better job with our budget and making even less trips. There were times where because my husband is practicing his driving for his license we ended up near a shopping center or at one and kind of just went in for a few things, like lets check out the clearance and oh lets get milk and made some impulse buys we didn't NEED. We certainly made use of them or stored them in our fridge or pantry but we really could've gone without because we had all our needs met already. My husband sometimes says "lets go out for a drive and/or get this one thing" and though I try to convince him lets just put it on a list and get everything we need on one day so we have less temptation and waste less gas on needless trips but convincing him doesn't always work or maybe I am not trying hard enough.
We have started using Mint.com and I think this will also give us a better idea of where our money goes and help us keep a closer eye and tighter leash on things, I think its already helping hubby see that these spur of the moment driving adventures are not helping us stick to our budget and we are both promising to keep one another in check about it. Hopefully next month we can do even better and continue to grow from there.
I plan to start menu planning based off the weekly ads and whatever is currently in my pantry, fridge or freezer. I shop Kroger most of the time with the occasional trip to Aldi, Albertsons or Walmart and my beloved Dollar Tree. I will often make a day of shopping since all these stores are within 10 minutes of my apartment and just hit them up in order from furthest to closest depending on what sales are available. Walmart usually only gets used for when we have more than just food shopping to do which is rare. Dollar Tree on the other hand we end up in way too often and yes everything is a $1 but when you fill up your cart with $1 items eventually it really adds up to surprising amounts.
Thank you all for joining me on this challenge. I hope we can all learn something from what I may have done right to what I may have done wrong. I think we started off strong and committed and fell off track. I hope to see more of you enjoying my page. Join me next month as we attempt to really get on track with getting this budgeting thing to work and as I integrate menu planning into our lives to hopefully add to our savings.
Leave a comment below if you have any thoughts or tips to share with us. Appreciate it, until next week.
Also check back soon for a little mini project I have in the works for Free printable to make Menu Planning easy and hassle free.
Tuesday, February 23, 2016
Homemade bread
This is a super easy recipe I have been using for homemade bread after much testing and seeing what works best after some just ok, then some pretty good loaves I adapted and found what works best. This makes a 1-lb loaf if you want to make a two point loaf simply double this recipe.
Here it is.

Ingredients:
3 Cups of Flour. *
2 Tbsp Oil (olive, vegetable or canola will work)
1 tsp Salt
2 Tbsp Sugar or Honey
1 Tbsp of Yeast
1 Cup + 1 Tbsp of Water (Note: You can also replace water with whey** or partially with milk)
Instructions:
Step 1 - Make your dough starter. Mix 1 cup of flour with your yeast, salt, sugar, water and oils in a bowl. Let that sit for about 10 - 20 minutes until doubled in size.
Step 2 - Add the remaining 2 cups of flour. If your dough is too sticky add dough until your dough clears the sides of your bowl. Knead your dough for 5-10 minutes on a floured surface. Allow to rise 30 minutes covered.
Step 3 - Grease your loaf pan. Knead and shape your dough into a loaf. Place into your pan. Allow your dough to rise in the loaf pan for 30 - 45 minutes covered with a light weight towel. Do not disturb or poke at your dough or all the height gained will deflate. If needed let rise longer until dough is at a good height, just above the pan is good as it will rise more when baking.
Step 4- Preheat your oven to 350. As the oven is preheating my stove top gets pretty warm and allows the loaf to continue rising a bit longer while it preheats. Once the oven is ready, place your loaf in the oven for 20 - 30 minutes.
Step 5 - Remove from pan and allow to cool on a cooling rack.
Or do what I do and have yourself a slice of that nice warm deliciously fresh bread with some butter or jam or even a sandwich.
Bread is my weakness!!! So is pasta and rice. Uuugghh all the stuff full of carbs... But thats besides the point.
I hope you enjoy this recipe and your fresh bread.
* You can use 1-2 cups of wheat flour. More than that ends up kind of dry/dense.
** Whey is by product of cheese making. I had lots left over last week from making ricotta. It gives bread a nice flavor. I will share the ricotta recipe soon. If you make it do not throw out your whey. Remember use everything waste less.
Note you can also use a food processor with a dough attachment.
Here it is.

Ingredients:
3 Cups of Flour. *
2 Tbsp Oil (olive, vegetable or canola will work)
1 tsp Salt
2 Tbsp Sugar or Honey
1 Tbsp of Yeast
1 Cup + 1 Tbsp of Water (Note: You can also replace water with whey** or partially with milk)
Instructions:
Step 1 - Make your dough starter. Mix 1 cup of flour with your yeast, salt, sugar, water and oils in a bowl. Let that sit for about 10 - 20 minutes until doubled in size.
Step 2 - Add the remaining 2 cups of flour. If your dough is too sticky add dough until your dough clears the sides of your bowl. Knead your dough for 5-10 minutes on a floured surface. Allow to rise 30 minutes covered.
Step 3 - Grease your loaf pan. Knead and shape your dough into a loaf. Place into your pan. Allow your dough to rise in the loaf pan for 30 - 45 minutes covered with a light weight towel. Do not disturb or poke at your dough or all the height gained will deflate. If needed let rise longer until dough is at a good height, just above the pan is good as it will rise more when baking.
Step 4- Preheat your oven to 350. As the oven is preheating my stove top gets pretty warm and allows the loaf to continue rising a bit longer while it preheats. Once the oven is ready, place your loaf in the oven for 20 - 30 minutes.
Step 5 - Remove from pan and allow to cool on a cooling rack.
Or do what I do and have yourself a slice of that nice warm deliciously fresh bread with some butter or jam or even a sandwich.
Bread is my weakness!!! So is pasta and rice. Uuugghh all the stuff full of carbs... But thats besides the point.
I hope you enjoy this recipe and your fresh bread.
* You can use 1-2 cups of wheat flour. More than that ends up kind of dry/dense.
** Whey is by product of cheese making. I had lots left over last week from making ricotta. It gives bread a nice flavor. I will share the ricotta recipe soon. If you make it do not throw out your whey. Remember use everything waste less.
Note you can also use a food processor with a dough attachment.
Saturday, February 20, 2016
Week 2 update - Cut Back Grocery Shopping Challenge
Here we are on week 2.
This Sunday was Valentine's Day. We had a nice day in at home and just spent it together as a family. As the homebodies we are, we're happy with that. Nothing is better than sitting at home and relaxing after a long week.
It didn't take long before I caved in and went shopping for flour since we ran out on Week 1 of this challenge. The kids and hubby were hoping I would bake some Valentines's Day treats and I knew it would come in handy for the rest of the week. I figured I would also cash in on some coupons Kroger had sent me about 2 weeks back since I was already going there. Free stuff??? Yes please, don't mind if I do! Free dozen eggs, free pint of ice cream and free bag of organic popcorn. Yes I know, I know. I said we were cutting back on junk but chocolate is my WEAKNESS. Plus I can't say no to free or cheap for that matter. Speaking of cheap, look what I found in my produce clearance section. Organic Veggies for only 99 cents. On the other hand though here is what I noticed, I went to the store for flour and freebies and came out with many unplanned things even if it was a good find.

Disclosure: Link is an affiliate link, If you make a purchase I earn a small percentage as a profit. There is no extra cost to you. Your support for this SAHM is appreciated.

- Homemade Vanilla cupcakes w/chocolate peanut butter center and a homemade chocolate coconut frosting

Day 2
- Overnight oats w/ homemade apple sauce mixed in and sliced bananas
- Leftover Chicken parmesan with Stuffed shells and eggplant
- Eggplant patties with seasoned veggies and mini vegetable samosas

Day 3
- Cold cereal
- PBJ sandwiches on homemade bread
- Cabbage stir fry with homemade naan (from freezer stash)
Day 4
- Cereal bars with yogurt
- Burrito - Using leftover black beans and rice. Added scrambled eggs, salsa and cheddar cheese.
- Soup - Made from Homemade chicken stock with veggies, beans and rotini pasta
Day 5
- Overnight oats w/ coconut chocolate
- Grilled chicken salad
- Crunchy beef tacos


Day 6
- PBJ sandwiches on homemade bread / Instant Oatmeal
Day 7
- Grilled cheese sandwiches with banana
- Chickpea salad
- Hamburgers on homemade bread
Stay tuned for more recipe links. I am a little behind on my blogging since my LO is sickie. But I will update ASAP.
This Sunday was Valentine's Day. We had a nice day in at home and just spent it together as a family. As the homebodies we are, we're happy with that. Nothing is better than sitting at home and relaxing after a long week.
It didn't take long before I caved in and went shopping for flour since we ran out on Week 1 of this challenge. The kids and hubby were hoping I would bake some Valentines's Day treats and I knew it would come in handy for the rest of the week. I figured I would also cash in on some coupons Kroger had sent me about 2 weeks back since I was already going there. Free stuff??? Yes please, don't mind if I do! Free dozen eggs, free pint of ice cream and free bag of organic popcorn. Yes I know, I know. I said we were cutting back on junk but chocolate is my WEAKNESS. Plus I can't say no to free or cheap for that matter. Speaking of cheap, look what I found in my produce clearance section. Organic Veggies for only 99 cents. On the other hand though here is what I noticed, I went to the store for flour and freebies and came out with many unplanned things even if it was a good find.

Gallon of Milk - $1.49 after 50 cents Ibotta Cash Back rebate
Eggs - Free & 50 cents money maker after Ibotta Cash Back rebate
Simple Truth Organic Popcorn - Free
Private Selection Ice cream - Free
Simple Truth Natural chicken breast - $4.59 after Digital Coupon
Flour - $1.79
2 Organic Cabbage - .99 cents for both
2 Organic Eggplant - .99 cents for both
1 Organic Cauliflower - .99 cents
3 Peppers - .99 for all three
Total: $ 11.33
I got these chicken breasts because hubby wanted a "good dinner" since we weren't going out to eat at a restaurant, so I splurged a little.
Disclosure: Ibotta link contains my referral code. If you sign up using my referral code you will get $10 into your account and I will be rewarded with $5 once you redeem your first rebate. Ibotta gives you cash back on groceries at many store locations. Check them out for more details. Or feel free to ask me any questions and I will be glad to answer them. In fact I may even make a post on my favorite money saving apps.
This week included lots of homemade goodies. Homemade, ricotta, bread, pitas, cupcakes frosting etc... I made three 1-lb loaves of bread. I started with one and that same day more than half had been eaten so I knew there was no way we would get through the week with just one, so I made two more. I made two of them using up the whey produced from the homemade ricotta and gosh they are tasty. Using my food processor made it a super easy task to mix up all the dough. It's not a Kitchen Aid mixer but it get's the job done at a nice price. I have been using it since November and I do not have any complaints.
Disclosure: Link is an affiliate link, If you make a purchase I earn a small percentage as a profit. There is no extra cost to you. Your support for this SAHM is appreciated.
Now here's a glance at what our week looked like
Week 2
Day 1
- V-Day themed breakfast. Homemade Funfetti Pancakes, eggs and sausage.
- Hot dogs and Homemade apple sauce (I canned a while back)
- Chicken Parmesan with Stuffed Shells with home made ricotta and eggplant- Homemade Vanilla cupcakes w/chocolate peanut butter center and a homemade chocolate coconut frosting

Day 2
- Overnight oats w/ homemade apple sauce mixed in and sliced bananas
- Leftover Chicken parmesan with Stuffed shells and eggplant
- Eggplant patties with seasoned veggies and mini vegetable samosas

Day 3
- Cold cereal
- PBJ sandwiches on homemade bread
- Cabbage stir fry with homemade naan (from freezer stash)
Day 4
- Cereal bars with yogurt
- Burrito - Using leftover black beans and rice. Added scrambled eggs, salsa and cheddar cheese.
- Soup - Made from Homemade chicken stock with veggies, beans and rotini pasta
Day 5
- Overnight oats w/ coconut chocolate
- Grilled chicken salad
- Crunchy beef tacos


Day 6
- PBJ sandwiches on homemade bread / Instant Oatmeal
- Grilled cheese and fried egg sandwich on homemade bread with chickpea salad
- Homemade pitas stuffed with lemon cilantro chicken and chickpea salad
Day 7
- Grilled cheese sandwiches with banana
- Chickpea salad
- Hamburgers on homemade bread
Stay tuned for more recipe links. I am a little behind on my blogging since my LO is sickie. But I will update ASAP.
Pancake Mix Recipe & Funfetti Pancakes
Homemade Funfetti Pancakes

Whenever we run out of pancake mix I usually make a run to the store. But not this time. I made my own pancake mix and it is super yummy. Much better and healthier than the store bought version and I always have these ingredients on hand in my pantry.


I found this empty container which usually houses my measuring cups and spoons but I use them so often they almost never make it back into the storage container anyway so it wouldn't be missed. I wrote the recipe and directions right on the container to make it easy for me to make a new batch when I run out or when I am cooking up a batch for breakfast.
Pancake Mix
- 4 cups of flour
- 3 Tbsp baking powder
- 3 Tbsp sugar
- 1 tsp salt
- 2 tsp baking soda
Add these all together to a container and mix until all is well combined.
As far as the flour goes I usually like to mix most recipes with at least one cup of whole wheat flour since it doesn't change the taste by much and usually goes unnoticed by my kiddos.
Directions for making batter: Yields about five 4" pancakes.
- 1 cup of pancake mix
- 1 egg
- 1 cup of milk or buttermilk or make your own homemade buttermilk (mix 1 cup of milk with 1 Tbsp lemon juice or white vinegar.let that sit for 10 minutes or so before use)
- 1 Tbsp of oil
To make these Funfetti Pancakes simply add to your batter:
- 1 tsp of vanilla extract (almond works well too)
- about 1/2 cup of sprinkles
The best sprinkles to use for this are cylinder sprinkles. These are the oblong shaped ones. They last better in the batter and don't bleed through. If all you have on hand are the round little ones like I did. I suggest adding them in as late as possible, I would wait until the batter is already on the pan and add in the sprinkles at that point. Otherwise these bleed into the batter terribly. Doesn't change the taste but it doesn't look as pretty.
I really recommend the buttermilk or homemade version for a nice flavor and extra fluffiness for your pancakes.
Cooking Instructions:
- Preheat a large pan or griddle. Grease your pan with cooking spray if your pan isn't non stick.
- Spoon the batter into pan. I usually use a soup ladle to keep the amounts even and it makes about a 4" almost perfectly round pancake.
- Cook for about 2-3 minutes until golden brown. A good indication is when you see bubbles the bubbles appear.
- Flip and cook for another 1-2 minutes.
- Repeat until all your batter is done
Serve alone, with butter, syrup or your favorite topping and enjoy. Cut out fun shapes with cookie cutters for your little ones. They sure find anything shaped so much more enjoyable and I love seeing the smiles it brings on their little faces. Plus, whatever gets them to eat, right. I'll give you the link for the ones I purchased from Amazon, they're a great value and bring so many choices which are great for holidays. Disclosure: Link is an affiliate link, If you make a purchase I earn a small percentage as a profit. There is no extra cost to you. Your support for this SAHM is appreciated.

Whenever we run out of pancake mix I usually make a run to the store. But not this time. I made my own pancake mix and it is super yummy. Much better and healthier than the store bought version and I always have these ingredients on hand in my pantry.


I found this empty container which usually houses my measuring cups and spoons but I use them so often they almost never make it back into the storage container anyway so it wouldn't be missed. I wrote the recipe and directions right on the container to make it easy for me to make a new batch when I run out or when I am cooking up a batch for breakfast.
Pancake Mix
- 4 cups of flour
- 3 Tbsp baking powder
- 3 Tbsp sugar
- 1 tsp salt
- 2 tsp baking soda
Add these all together to a container and mix until all is well combined.
As far as the flour goes I usually like to mix most recipes with at least one cup of whole wheat flour since it doesn't change the taste by much and usually goes unnoticed by my kiddos.
Directions for making batter: Yields about five 4" pancakes.
- 1 cup of pancake mix
- 1 egg
- 1 cup of milk or buttermilk or make your own homemade buttermilk (mix 1 cup of milk with 1 Tbsp lemon juice or white vinegar.let that sit for 10 minutes or so before use)
- 1 Tbsp of oil
To make these Funfetti Pancakes simply add to your batter:
- 1 tsp of vanilla extract (almond works well too)
- about 1/2 cup of sprinkles
The best sprinkles to use for this are cylinder sprinkles. These are the oblong shaped ones. They last better in the batter and don't bleed through. If all you have on hand are the round little ones like I did. I suggest adding them in as late as possible, I would wait until the batter is already on the pan and add in the sprinkles at that point. Otherwise these bleed into the batter terribly. Doesn't change the taste but it doesn't look as pretty.
I really recommend the buttermilk or homemade version for a nice flavor and extra fluffiness for your pancakes.
Cooking Instructions:
- Preheat a large pan or griddle. Grease your pan with cooking spray if your pan isn't non stick.
- Spoon the batter into pan. I usually use a soup ladle to keep the amounts even and it makes about a 4" almost perfectly round pancake.
- Cook for about 2-3 minutes until golden brown. A good indication is when you see bubbles the bubbles appear.
- Flip and cook for another 1-2 minutes.
- Repeat until all your batter is done
Serve alone, with butter, syrup or your favorite topping and enjoy. Cut out fun shapes with cookie cutters for your little ones. They sure find anything shaped so much more enjoyable and I love seeing the smiles it brings on their little faces. Plus, whatever gets them to eat, right. I'll give you the link for the ones I purchased from Amazon, they're a great value and bring so many choices which are great for holidays. Disclosure: Link is an affiliate link, If you make a purchase I earn a small percentage as a profit. There is no extra cost to you. Your support for this SAHM is appreciated.
Subscribe to:
Posts (Atom)